How do I create a new signing?
Make sure you have the correct permissions to create a new signing process.
When you are in E-signing, you can click the button on the right called "New Signing" as shown in the image below.

Select document
The first thing you need to do is choose which document you want to send for signing. Here you have two different options.
Upload a document from your computer
If you have clicked the button to upload a document, you can either drag a PDF into the dashed area or click the link "Upload a file" to select the PDF you want to send for signing. Please note that we only accept PDF files for signing and that it should not be write-protected/encrypted and should be a maximum of 30 MB in size.

When you have selected the document you want to send for e-signing, a box will automatically pop up with information about the uploaded document.

- Here, a preview of the document you have selected is displayed. Make sure to double-check that it is the correct document.
- Some information about the document such as file name and file size (remember that it must not be larger than 30 MB)
- Select the flow that the document will go through. After the document has been sent for signing, it will be placed in one of your archives just as if you uploaded the document via "Upload." By selecting a flow, you determine which archive this document will end up in.
- Was there a mistake and you want to upload another document? Press the "Remove" button to start the process over.
- Do you need to include attachments? Click the "Add attachments" button, and a box will pop up where you can select the attachments you want to send. NOTE! We also only accept PDF files for attachments. This is because your document will be combined with all attachments (attachments are added after your document) and create a new PDF file that will be uploaded. This allows you to search for this document even in the text of the attachments.
When you are satisfied and have selected the document, flow, and any attachments, click "Next" to proceed.
Existing document
If you already have a document in doCuro that you want to send for signing, then choose the "Existing document" button instead of "Upload."

- Search for the existing document by its running number. When you have found the running number for the document you want, click "Search." If the document is found, you will see a preview like the one above. Make sure it is the correct document to be sent for signing.
- If it is not correct, you can click the "Remove" button to start over.
When you have selected the correct document, click the "Next" button to proceed.
Select recipient
The next step is to choose which recipients will be included in this signing process. A signing process can, and often does, have more than one recipient. Start by filling in First Name, Last Name, Language, Email, and possibly phone number for the first recipient as you see below. The language you choose is the language that this recipient will receive their email in and the interface when they are to sign. Phone number is usually not necessary unless signing with SMS functionality.

Once you have filled in the details for this recipient, you need to choose what they should do. There are two different options:
- Sign - The recipient needs to sign this document and all attachments. This can be done in various ways, such as through BankID.
- Review - The recipient does not need to sign but should review and ensure everything looks correct. The reviewer can choose not to approve the process, in which case it is canceled.
When this is chosen, click the "Add" button to add this recipient. After you have added the first recipient, you will see an option to add more recipients (point number 2 in the image below). When you have added this recipient, you will see that the button changes from "Add" to "Update" (point number 1 in the image below). Keep in mind that if you change, for example, the first name of an already added recipient, you need to click the "Update" button for the changes to take effect.

Add all recipients and their roles, and when you are done, click the "Next" button.
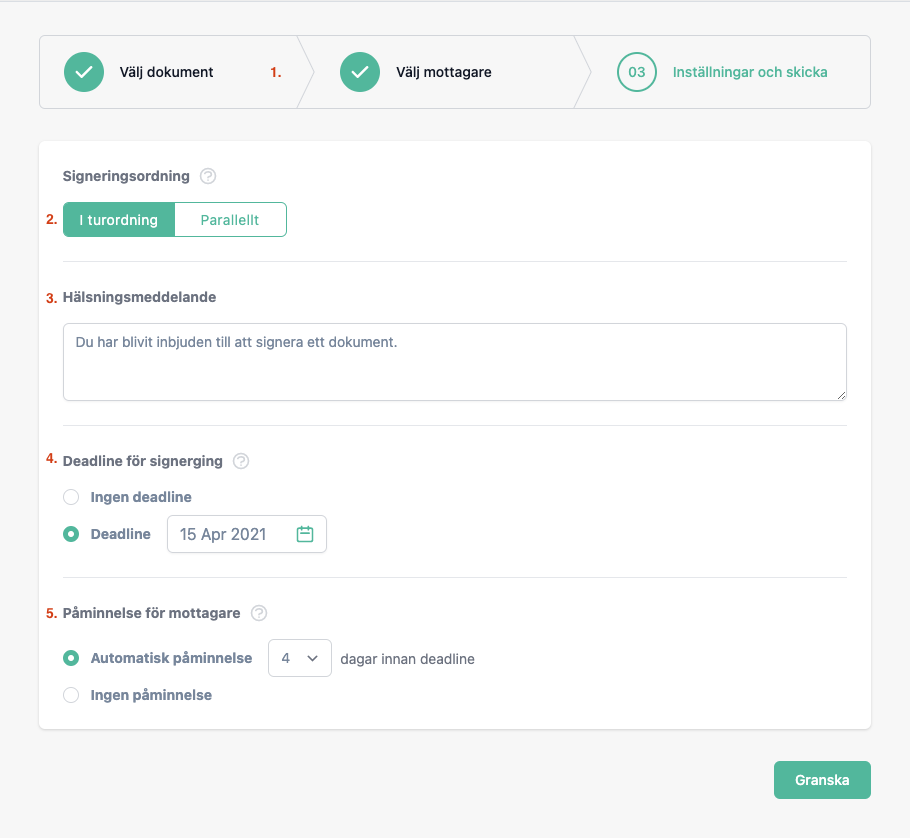
Settings for the signing process
Once you have added all recipients for the signing process, the final step is to set the settings and then send the document for signing. If you look at the image below, these are the settings available for a signing process.
- Remember that you can go back in the process if you want. Say you forgot to add a recipient, then press the "Recipients" section at the top to go back.
-
If you have added more than one recipient, you will have a choice regarding how you want the order to proceed in the signing process. If you choose Sequential , an email will be sent to the first recipient who will have the opportunity to sign. When this person has signed, it will be sent to the second recipient, and so on.
If you instead choose that the order should be Parallel , it will be sent for signing to all recipients simultaneously. When everyone has signed, the process is complete.
- This greeting message will appear in the email sent to your recipients. Be sure to write something that makes the recipients understand what this is about, for example, "Hello Fredrik and Johanna. Here comes the agreement for the telecom service we talked about last time. Please sign the agreement so that everything is ready. Best regards, Peter."
- You can set a deadline for signing. This deadline can only be in the future, and after this deadline, it will no longer be possible to sign the document.
- If you have set a deadline, you will have the option to set a reminder. Here you can choose for everyone who has not yet signed to receive a reminder, for example, 4 days before the deadline.
When you have filled in the settings, you can press Review to go through everything to ensure it is correct, and if everything is correct, click "Send" to start the signing process.
In a few minutes, your document will end up in the archive you chose in step 1 when you selected the flow. If the document has not arrived, you can check here.